Sunday, January 29, 2012

Weekly Photography Challenge: 'D' - Depth of Field

Let me set the stage for you for this short series of Depth of Field photographs.  A beautiful Saturday morning sunrise in the foothills as we begin our trip to Mt. Rushmore.  As we get to Mt. Rushmore, we venture out of the vehicle believing it will be a chilly morning, but that luckily, the wind hasn't fired up to the 35mph forecasted.  We step out of the parking garage and WHAP!  The wind is howling turning 27 degrees into zero degrees with wind chill!  Needless to say, artistically the photos are evident of the conditions of the weather.  I'm still laughing at my model yelling, "Hurry up!" as my fingers are literally frozen and unable to change the aperture settings.  Oh well, the things we do for our love of photography!

Depth of field (DOF) is the distance between the nearest and farthest objects in a scene that appear acceptably sharp in an image.  Although a lens can precisely focus at only one distance at a time, the decrease in sharpness is gradual on each side of the focused distance, so that within the DOF, the blur is imperceptible under normal viewing conditions.

In some cases, it may be desirable to have the entire image sharp, and a large DOF is appropriate.  In other cases, a small DOF may be more rewarding, emphasizing the subject while de-emphasizing the foreground and/or background.

Depth of Field Tutorial by Dakota Visions Photography LLC
70mm - f/18
Depth of Field Tutorial by Dakota Visions Photography LLC
70mm - f/4.0

Quick Reference Guide:  Depth of field is governed by three factors - aperture, lens focal length, and shooting distance.  Remember the following relationships:
  1. The smaller the aperture, the deeper the depth of field (the other two factors remaining the same).  For example, if the lens focal length and the shooting distance stay the same, the depth of field is much deeper at f/16 than at f/1.4.
  2. The shorter the lens focal length, the deeper the depth of field (the other two factors remaining the same).  For example, comparing a 28mm lens with a 50mm lens at the same aperture and shooting distance, depth of field is deeper with the 28mm lens.
  3. The greater the shooting distance, the deeper the depth of field.  For example, if the subject is photographed from 10 and then from 25 feet away, the zone of sharpness is greater at 25 feet.
Depth of Field Tutorial by Dakota Visions Photography LLC
70mm - f/18
Depth of Field Tutorial by Dakota Visions Photography LLC
70mm - f/5.6

So what DOF should you use in your photographs?  That is where your artistic interpretation comes into play.  What are you trying to emphasize?  The person?  The background including the national landmark, Mt. Rushmore?  Each photograph tells a story - it's now your turn to use the depth of field photographic knowledge to help choose which story to tell.

Next week's photography challenge is the letter 'E'.  We've already started thinking about what to do to get our of our 'photographic box' for next week's challenge. 

Don't forget that if you want to share your own photographs from your weekly challenge with the letter 'D', just include the link to your web gallery in the comments below (Flickr, Picasa, or others).

We hope you enjoyed and learned a little from the weekly photographs.  We will See You Behind the Lens...

Thursday, January 26, 2012

Bird Photography: Opportunties to Overcome - 5 Tips

Let me think, birds...small, rapid movement, never sit still, fast, poor lighting conditions, and so conscious of their surroundings that you can never get near them.  You have thought it.  I have thought it.  We all have thought that because of these reasons we just won’t take photographs of birds.  Let’s quit blaming Hitchcock or our own ornithophobia and overcome our fears together.

Here's five quick tips on bird photography.
5.  Respect  Respect for the birds domain, safety, and well-being.  Do not put a bird at risk just so you can get a great photograph.  Go it alone, don’t bring the cat along just because you think it will make a great photo.  Besides, going it alone allows you to observe the birds in their natural habitats and allows you to display non-threatening body language.  They really can read you like a book!

American Bald Eagle Taking Flight Bird Photography Tips by Dakota Visions Photography LLC
American Bald Eagle - Taking Flight
4.  Understand the Light & Background Photographing a bird in a tree gives you a tough lighting situation against the sun unless you shoot during the early morning or late afternoon.  (Refer to Tip 5)  Because birds move around so much, you have to be aware of the background as well.  Watch for homes, electric poles, and miscellaneous other items in the background while you are setting up.  While some of these items can be used to enhance composition, they can also distract from it if not planned for.

American Goldfinch Male Winter Colors Bird Photography Tips by Dakota Visions Photography LLC
American Goldfinch - Male Winter colors
3.  Timing  Timing is a key issue.  Most bird species are more active in early morning or late afternoon.  Purchase a phone app or book that provides local species migration and location information or check out your local ornithology website.  If you are looking for bald eagles in the middle of summer at Gavins Point Dam near Yankton, SD – you probably won’t find them.  They are usually more prominent during the months of Dec – Feb fishing the open water below the dam.

Common House Finch Female Bird Photography Tips by Dakota Visions Photography LLC
Common House Finch - Female
2.  Glass  Bird photography will cost some money, but only after you are sure you it's something that works for you.  Use the longest lens available.  You will generally want a 200mm w/extension, 300mm, 400mm, or higher if you can afford it.  Or you are going to have to spend additional time setting up camouflage blinds to allow you closer proximity.

Black Billed Magpie Bird Photography Tips by Dakota Visions Photography LLC
Black-billed Magpie
1.  Practice  Start with the birds in the backyard.  (Yes, even as a wildlife photographer who doesn't shoot in captivity - I practice in my backyard!)  No, you probably won’t get that shot that will win you fame and acclaim, but like everything else – you have to practice.  Set up bird feeders and watch their actions.  Use this opportunity to learn their language, their hierarchy, and normal patterns of movement.  Watch what branches they land on near the bird feeders and prepare your shots.  Make notes to help you prepare for birds in the wild.  Get used to catching them in flight with the correct camera settings.  Learn what camera settings work in the lighting conditions and what shutter speeds are most effective for the type of photograph you want to shoot. 
Practice really does make you a better bird photographer.  I’m still learning all of the different techniques for catching a bird in flight but that's a topic for another post. 

If you have some great bird photography to share, please list a link to your photography on your online web gallery below in the comments section.  Click the Facebook icon below this story to share it on your own page.  Good luck and we’ll see you behind the lens…

Sunday, January 22, 2012

Weekly Photography Challenge: 'C' - Church

One of the last things that you will see me doing is taking architecture photography.  In fact, just because getting the camera out in the urban landscape is difficult for me, this was the perfect challenge.  This week was about getting out of my comfort zone and finding something interesting associated with a church to intepret the letter 'C'. 

The weather has been nothing but dreariness filled with clouds this week, so the photograph had to be of something bold to overtake the dark skies.  After bombing out at a local tourist attraction of a Scandinavian church that is closed until May of 2012, I was about to give up and go for my familiar Canadian geese.  But, I stuck to my guns and followed up on a church that I have noticed in the past.  I continually end up driving by it with my face planted on the vehicle dash looking up to the spherical shape topped with a cross.

Church Cross by Dakota Visions Photography LLC


This week's photography challenge has reminded me that taking micro shots of a macro subject can bring out some very interesting photographs.  Another item that I have been reminded of is that you always need to keep notes.  (You know, they make an app for that!)  Luckily I remembered the location of this church, but take notes anyway.  During a summer sunset when the clouds are light and puffy with that deep burning sunset glowing off the cross - you might just find me at this church again.  (Now that I have notes and parking spots located to catch the cross against the pure sky.  Just notice how much location can change the photograph - not only the shot itself, but the light as well.)

Church Cross by Dakota Visions Photography LLC


Next week's photography challenge is the letter 'D'. We've already started thinking about what to do to get out of our 'photographic box' for next week's challenge. Will it be a dog, depth of field, or possibly a David?

Don't forget that if you want to share your photographs from your own weekly challenge with the letter 'C', just include the link to your web gallery in the comments box below (Flickr, Picassa, or others).

We hope you enjoy, and See You Behind the Lens...

Thursday, January 19, 2012

Business: Success on a $0.00 Budget

We want to help you become a more successful small business because you are worth every penny we are going to spend today!  (Wait...what?!  You told me we are spending nothing, zippola, nada!)

Alright, let's get serious about your business regardless of what we are going to spend today.  This blog article will give you five quick tips on how to become more successful in promoting your brand and using free advertising dollars to expand your reach. 

How did these techniques help us?  We gained 1,900 blog pageviews, 150 followers on Facebook, a Facebook reach close to 18,000 people, and 450 unique visitors to our photography gallery in a little over one month because we used these techniques. 


5. Use power words and positive language in your blog posts. 
'You' and 'because' are two very powerful words to use in your blog articles or Facebook posts.  Having an intimate conversation with people garners the trust they need to press the Like button or subscribe to a feed, rather than a constant call for 'click this' or 'share that'.  Using a 'because' statement scientifically gains a 30% more positive response than not using the word - no matter how you use it in the sentence!  Just look at our first sentence.  Additionally, I think it goes without saying that expletive language, poorly spell checked posts, and constant negative rants will get you Unlikes quicker than you can say *^#@#&!

4.  Submit your site on free website listing directories. 
Gain exposure for your sites by listing them with the free listing sites out there such as StumbleUpon, Alltop, and Technorati for your blog.  Make sure your website and business are listed in Manta, a free directory for business owners.  There are many low-cost photography listing services available if you are willing to spend $5-$10, like Photolinks.  Most importantly, make sure your business websites are included as a tagline on emails that you send, and don't ever post to Facebook/social media without including a link to one of your sites or a photograph that is watermarked.

3.  Use that Google AdWords/Microsoft Adcenter free coupon. 
When you sign up for any of the webmaster tools, when you buy products for your website, or when you receive that junk mail/email - don't throw it away!  USE IT!  That $50, $75, or $150 dollars worth of advertising is FREE!  I was able to use $350 worth of Google AdWords coupons and $50 worth of Microsoft Adcenter coupons from the 'junkmail' I recieved when I first set up my website.  Set up your ad settings to use only the free money and watch the visitors to your websites grow!

2.  Use Social Media. 
Plain and simple - use Social Media.  Do you only have a personal Facebook page?  Get that business page set up!  Make it easy to click and share via social media buttons on your main photography gallery website.  Watch how you are displaying the photographs in your gallery, because it will affect your SEO listings, especially if you are using Flash.  (We'll cover that another day.)  But most importantly...

1.  Post good content. 
Whether it is a blog post or a photograph to your gallery, stop and re-think why you are posting it.  Is it the type of quality post that you want to be associated with in when your site has a 1,000 followers?  Would you read it, re-tweet it, forward it to your friends, or want to buy that photograph?  If you even stumble at answering those questions - STOP!  Posting just to post will get you in trouble real fast.  Think, plan, and execute the plan. 

While this is not an exhaustive list, we will continue to post more business related articles as we move forward, sharing our success and our failures with you.  If you have suggestions on future business articles, leave a comment below. 

We hope you enjoyed, and will soon See You Behind the Lens...

Sunday, January 15, 2012

Weekly Photography Challenge: 'B' - Bald Eagle

So how did you spend your Saturday morning?  Sleeping in?  Family breakfast?  We chose to spend this Saturday morning getting up before sunrise and trekking across Custer State Park in the South Dakota Black Hills to Wind Cave National Park (I know - crazy, huh?!)  We have been seeing a lot of bald eagles this winter and were hoping to catch that 'prize shot' that we all dream of!  Well, there wasn't the opportunity for that once-in-a-lifetime shot, but we did get to spend a great morning photographing bald eagles, elk, buffalo, antelope, and talking to fellow photographers. 


This bald eagle is probably one of the most photographed bald eagles in the Black Hills.  From his injured left talon to his scarred up beak, he is easily recognizable.  The trek Saturday morning involved a conversation with another local photographer in the area.  (Of course, both of us stopping to take photographs, even though the eagle was in a tough position tangled in branches on a dead tree.)  One of the theories floating around is that this eagle was injured and nursed back to health by humans, thereby allowing him to be tolerant of human interaction.  We are not sure about this story, but his grandeur is so overbearing that he easily stands out among the branches. 


The point we would like to get across in this week's photography challenge is that not every photograph you take will be spectacular, but learn from each time you have the camera out.  Learn about your subjects - their habits, their quirks, and their habitat (this goes for humans just as much as it does for wildlife.)  Learn about your camera - put it in manual setting, try changing to manual focus, or experiment with aperture settings.  It will help you set up that once-in-a-lifetime shot, that is exactly that - once in a lifetime!  But for this week, we'll settle for the goosebumps that crawled on our skin as we had the opportunity to photograph the national bird. 


Next week's photography challenge is the letter 'C'.  We've already started thinking about what to do to get out of our 'photographic box' for next week's challenge.  Will it be cheese, a church, or maybe something cotton?  Maybe Chelsea or Chad?

Don't forget that if you want to share your photographs from your weekly challenge with the letter 'B', just include the link to your web gallery in the comments box below.  We hope you enjoy, and See You Behind the Lens... 

Thursday, January 12, 2012

Wacky Gift Idea - Vintage Camera Pillows


After shooting with my Canon DSLR for so long, I forgot how soft and cushy those old Rolleiflex cameras are.  Wait, huh?! 

Do you have to buy a gift for a photographer's upcoming birthday?  Still need to get that thank you gift for that helper on your last onsite shoot?  Just want a conversation starter for the sofa in your studio entrance?  Here is a great idea then - a vintage camera pillow!  This Etsy seller based in the United States has nine different vintage camera pillows to choose from. 
Wacky Vintage Camera Pillow by Dakota Visions Photography LLC


Wrap up this retro cushion for the photographer in your life today!  Choose from Kodak, Ansco, Amica Eyelux, and more.

As long as you don't fall asleep on your new pillow, we'll See You Behind the Lens...

Friday, January 6, 2012

Weekly Photography Challenge: 'A' - Antique

For the first week of the See You Behind the Lens Weekly Photography Challenge, we needed to shoot something representing the letter 'A' for our twist on the Alphabet Challenge.  We chose 'A' for 'Antique' and included using the DIY Light Tent from this week's SYBTL helpful hints.  (Fooled you with the apple shot, didn't we!?!)  The antique is a Steky Model III 16 mm Miniature Spy Camera made in Japan from 1950-1952.

Using the DIY Light Tent, we placed the antique on a piece of white muslin for background texture and a sharp, crisp look.  We used two lights on each side of the light tent with no overhead lighting.  We positioned the Steky so the imprint/logo, the Stekinar Anastigmat lens, as well as the model number on top of the camera all showed.  We wanted an exposure under 1 minute and opened the aperture up to get most of the Steky crisply focused, but left some areas a little out of focus for the feeling of depth.  Post-processing included white balance, noise reduction, and a little sharpening to make the model number/Steky logo pop.

Steky Model III 16mm Miniature Spy Camera by Dakota Visions Photography LLC

Antique Specifications:
  • First introduced in 1947 by Riken Kogagu (Richo)
  • Steky : 16mm miniature camera
  • Lens : Stekinar Anastigmat f3.5/25mm
  • Lens mount : Screw-in mount
  • Shutter : two-sector behind-the-lens shutter
  • Shutter speeds : B, 1/25, 1/50, 1/100sec.
  • Viewfinder : reverse-Galilean finder
  • Finder magnification : 0.67x
  • Film winding : by film wind knob

Add a comment below and a copy of your photograph if you followed the Weekly Photography Challenge!  Just paste a link from your web album (Picasa, Flickr, Facebook, etc.) into your comment so we can follow you.  We may even ask to show off your photograph in next week's post!  Hope you had fun and got out of 'your photography box'!  We definitely stepped out of our normal wildlife and landscape genre!  But that's what a weekly photography challenge is all about.

So join us next week and be ready to post your pictures on Sunday.  Next week's letter is 'B'.  What to do, what to do...Bokeh?  Buffalo?  How about coming up with the concept of Bulls**t?  We can't wait to see what everyone comes up with! 

See You Behind the Lens...

Tuesday, January 3, 2012

DIY LIGHT TENT: IS IT WORTH IT?

We read the blogs, the posts, the articles online about DIY projects, but are they really worth it?  When my personal photography project this year turned to the alphabet, all I could think about for the letter 'A' was food photographs.  You know - apples, artichokes, asparagus, etc... 

Well, the point of a photography challenge is to get out of your comfort zone - right?!  After reading up on food photography, I continually saw light tents being used.  So I did some research and behold - there are DIY light tent articles all over the blogosphere!  So I took some of the higher rated how-to's and created a hybrid of what I thought would work best.  Here's how it went...

Materials:
Medium cardboard moving box (18"X18"X16")
Bristol Paper - Large Sheets to fit your box (found at most craft stores like Micheal's)
Velcro - optional
Glue or Tape
Classic White Bleached Muslin (yard should work unless you choose larger box)
CFL 'Daylight' Bulbs, 3 Pack of 60 Watt Equivalent (Optional Use of 100W Equivalent)
2 or 3 Desk / Clip On Office Desk Lamps - Clip On or Larger Desk for top of box
Scissors
Exacto Knife or Utility Knife
Pencil
Measuring Ruler and/or Straight Edge/Yardstick

Approximate Time Needed to Complete:
2 hours


Step by Step Procedure:
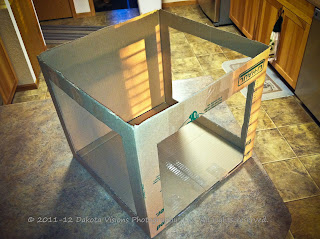
  1. Place the box in front of you with the top open facing towards the ceiling.  With the pencil mark the front with 'F', the two sides with 'R' and 'L' with the fourth side receiving the word 'Back' on it.  On the right and left sides of the box use the ruler and mark 2 inches from the side of the box all the way around to form a frame.  Repeat for the left side.  These will form the two framed openings that will let light in on the side of the box.  In the front, mark the two inches around the right, left, and top of the opening.  I chose to take the opening all the way to the bottom of the box in the front window.  This will allow me to move the fabric or Bristol paper around when we complete the light tent.
  2. Use an Exacto knife or utility knife to cut the framed openings.  Cut the box top off.  Please make sure to leave the bottom intact!  (I taped mine to ensure a good fit.)
    DIY Light Tent Is It Worth It by Dakota Visions Photography LLC Photography DIY Projects
  3. Measure out 2" strips on the Bristol paper to be used to glue inside the box.  11 strips will be needed.  Measure them to fit your box dimensions for length.
  4. Glue the paper strips into the inside of the box.  Make sure the side that has any pencil markings goes against the cardboard so it will not be seen.  (Note, the color of the outside of the box does not matter.) 
  5. Measure two pieces of Bristol paper to cover the inside bottom of the box, and the rear face of the box.  This is optional, but we choose to do this so if we switch out paper or muslin backgrounds - the box is uniform in color. 
  6. Glue the paper pieces into the inside of the box on the back and bottom.
  7. Measure the muslin to be 4" wider then the top of the box measured from top of the front opening to top of the solid back.  This will be the width of the muslin and allow the muslin to cover the front of your cardboard box with room for overhang in the back of the box.  (My muslin width measured: 22".)
  8. Measure from the base of the right side up to the top of the box, across the top of the box, and down the left side of the box to the bottom.  (My muslin length measured: 16"+18"+16"=50".)
  9. Cut the muslin to the measured dimensions (actually tearing from a small cut works just fine).
  10. Glue or tape the muslin stretched over the top of your box.  Glue or tape the front three 2" framed sides to the opening first.  You will need to fold the muslin at the top two corners in front of the light tent.  Glue or tape half of the length of the box from front to back, starting in the front.  (This will allow you to open the muslin from the back half of the box if you want to replace the background.)
    DIY Light Tent Is It Worth It by Dakota Visions Photography LLC Photography DIY Projects
  11. Cut two small strips of the male type of Velcro and attach to the bottom corners of the muslin in the back of the box.  Line up and mark on the box where the two female strips of Velcro should be placed.  Place the female strips of Velcro on the box.  (This will allow you to pull the muslin tight on the box to keep wrinkles on the side or top from creating shadows in your light tent.)
  12. Cut another piece of muslin or Bristol paper so the width is the same as the inside of the box and the length is at least 2 times the height of the box.  This will create your background, and this is where your creativity can come into play.  Either tape the Bristol paper to the top back of the box, or hang your muslin from the top back of your box.  (You may need to tape the muslin backdrop to the back of the box to keep ripples from happening.  Use different colors, fabrics, or materials for different looks.  White muslin or white Bristol paper creates that standard "product for sale" image seen on many websites.  Black velvet gives a nice warm feeling.)
  13. Place lights on the two sides of the box to get that crisp, double shadow look.  Light from the top of the box creates nice soft shadows.  From all three sides, creates that 'floating in space' look.
    DIY Light Tent Is It Worth It by Dakota Visions Photography LLC Photography DIY Projects