Note: We would like to make a note that not all photographs look good with this high-contrast, desaturated style. It looks great on photographs with lots of detail and texture including city shots, some landscapes, industrial decay, and even people (especially guys and extremely effective with a five o'clock shadow or facial hair).
Objective:
This will be a beginner's tutorial using Lightroom 4 to achieve the '300' movie look on a portrait to create a photo like what is found below.The '300' Look: A Lightroom 4 Tutorial
1. Let's begin with exposure in the Development Module in the Basic panel. Move your exposure to at least 0.50 or higher. In this particular photograph, we choose 0.83.
2. Continue working through the sliders in the Basic panel. Our settings for this particular photograph are shown to the right, but you should get the main idea of what will help with your settings for your particular shot. Pushing the Clarity slider to the extreme will help us add "punch" to this photo.
3. The Tone Curve should be set between the Medium and Strong Contrast settings. If you are comfortable with adjusting the tone curve yourself, a custom setting is the best here.
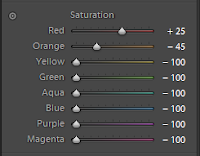
4. For the HSL (Hue, Saturation, Luminance) / Color / B&W Panel we will focus solely on the Saturation portion. As noted in our settings for this photograph, the main goal here is to desaturate the photograph. Note our settings to the right.
5. Continue on to the Detail Panel in the Development Module. We are going to sharpen the photograph to the extreme - but the important parts are the radius, detail, and masking settings. Note ours below:
These should be the main settings to get you on your way to establishing a great '300' sytle photograph. Note: We post-processed in Adobe Photoshop using the magic wand to capture our model on and place on a black background layer. Some darkening was done around the edges of the head plus placing a grunge texture in a light layer for additional effect. No additional HSL or sharpening work was done in Photoshop.
We hope this gets you started on creating some of your own great looking 300-like portraits. Presets can be your friend, but you really begin to learn how different development module panel features work within Lightroom to open the world of post-processing up. Now..."Give thanks, men, to Leonidas and the brave 300! TO VICTORY!"
Don't forget to join us on Facebook, Pinterest, Google+ , Twitter, or sneak a peek at our photography on Dakota Visions Photography, LLC. Until next time, we'll see you behind the lens...
Subscribe to See You Behind the Lens...


No comments:
Post a Comment
Feel free to comment on See You Behind the Lens... We will be reviewing your comment and post shortly. Thanks for joining in the conversation!
Dakota Visions Photography, LLC
www.dakotavisions.com