Sunday, February 24, 2013

Sleek, Sexy, Shiny Lines: Counts Car Show 2013

Sleek, shiny, and sexy lines... What else do you look for when a car show like this comes to town.  I love the sleek look of a car, the shiny lights bouncing off a perfectly waxed body, and those sexy lines looking like a voluptuous woman lying on the beach.  Oh, yeah, we are talking about a car show, right?!  When the Counts of the Cobblestone's Car Club Annual Car Show comes to the Civic Center in Rapid City each spring, it's a sure sign that the cars are about to hit the streets again.

Let's take a drool together...I mean a stroll.  We hope you enjoy...

Corvette Counts of the Cobblestone's Annual Car Show Rapid City SD photos by Dakota Visions Photography LLC www.dakotavisions.com

1959 Corvette Counts of the Cobblestone's Annual Car Show Rapid City SD photos by Dakota Visions Photography LLC www.dakotavisions.com

1947 Continental Counts of the Cobblestone's Annual Car Show Rapid City SD photos by Dakota Visions Photography LLC www.dakotavisions.com

1947 Continental Counts of the Cobblestone's Annual Car Show Rapid City SD photos by Dakota Visions Photography LLC www.dakotavisions.com

Ford Delivery Van Counts of the Cobblestone's Annual Car Show Rapid City SD photos by Dakota Visions Photography LLC www.dakotavisions.com

1959 Corvette Counts of the Cobblestone's Annual Car Show Rapid City SD photos by Dakota Visions Photography LLC www.dakotavisions.com

Camaro Counts of the Cobblestone's Annual Car Show Rapid City SD photos by Dakota Visions Photography LLC www.dakotavisions.com

Don't forget to join us on Facebook, Pinterest, Google+ , Twitter, or sneak a peek at our photography on Dakota Visions Photography, LLC. Until next time, we'll see you behind the lens...

Subscribe to See You Behind the Lens... Google

Saturday, February 23, 2013

Counts Car Show in Rapid City, SD: Teaser

Sometimes there is a car so iconic, that just the hood ornament is enough to know what you are looking at.  We had a little fun at the Counts Car Show in Rapid City, SD this weekend, and took the macro lens out.  Just a teaser - more to come...

Counts Car Show in Rapid City, SD - Corvette hood emblem

Don't forget to join us on Facebook, Pinterest, Google+ , Twitter, or sneak a peek at our photography on Dakota Visions Photography, LLC. Until next time, we'll see you behind the lens...

Subscribe to See You Behind the Lens...

Saturday, February 16, 2013

Badger Clark, Jr: The Cowboy Poet

Charles Badger Clark, Jr., was the youngest son of a popular Methodist minister who inherited the rich speaking voice of his father but not the piety. During his lifetime he achieved a degree of recognition as a western poet and earned the title of South Dakota's first poet laureate in 1937 by then governor, Leslie Jensen. Because he never flaunted his fame, he was largely unknown outside of his home state. The fact that his best-known poem, 'A Cowboy's Prayer' was widely reprinted under the 'Author Unknown' surname, contributed greatly to his anonymity. So in honor of South Dakotan's Poet Laureate, here is one of his poems set to photographs.

The Coyote

Trailing the last gleam after,
 In the valleys emptied of light,
 Ripples a whimsical laughter
 Under the wings of the night.
 Mocking the faded west airily,
 Meeting the little bats merrily,
 Over the mesas it shrills
 To the red moon on the hills.
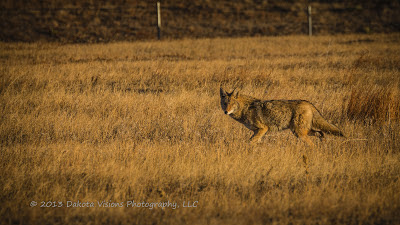
Badger Clark Jr The Coyote accompanied with photographs by Dakota Visions Photography LLC
Mournfully rising and waning,
 Far through the moon-silvered land
 Wails a weird voice of complaining
 Over the thorns and the sand.
 Out of blue silences eerily.
 On to the black mountains wearily,
 Till the dim desert is crossed,
 Wanders the cry, and is lost.
Badger Clark Jr The Coyote accompanied with photographs by Dakota Visions Photography LLC
Here by the fire's ruddy streamers,
 Tired with our hopes and our fears,
 We inarticulate dreamers
 Hark to the song of our years.
 Up to the brooding divinity
 Far in that sparkling infinity
 Cry our despair and delight,
 Voice of the Western night!
By Charles Badger Clark, Jr

Don't forget to join us on Facebook, Pinterest, Google+ , Twitter, or sneak a peek at our photography on Dakota Visions Photography, LLC. Until next time, we'll see you behind the lens...

Subscribe to See You Behind the Lens...

Monday, February 11, 2013

The 300 Look: A Lightroom Tutorial

The movie, '300'...it had a look.  We've seen the movie, we've seen it imitated in posts on Facebook, Google+ and Pinterest - but how the heck do they do it?  The easy answer, well, you can find a preset for that, but we don't like that answer.  The more you learn about the development module panels, the better you will become as a post-processing guru! 

Note:  We would like to make a note that not all photographs look good with this high-contrast, desaturated style.  It looks great on photographs with lots of detail and texture including city shots, some landscapes, industrial decay, and even people (especially guys and extremely effective with a five o'clock shadow or facial hair).

Objective: 

This will be a beginner's tutorial using Lightroom 4 to achieve the '300' movie look on a portrait to create a photo like what is found below.

300 Look: A Lightroom Tutorial by Dakota Visions Photography LLC www.seeyoubehindthelens.com

The '300' Look: A Lightroom 4 Tutorial

Import your photograph into Lightroom 4 using your normal workflow to begin this tutorial.


1.  Let's begin with exposure in the Development Module in the Basic panel.  Move your exposure to at least 0.50 or higher.  In this particular photograph, we choose 0.83.

Basic Panel in The 300 Look: A Lightroom 4 Tutorial by Dakota Visions Photography LLC www.seeyoubehindthelens.com
2.  Continue working through the sliders in the Basic panel.  Our settings for this particular photograph are shown to the right, but you should get the main idea of what will help with your settings for your particular shot.  Pushing the Clarity slider to the extreme will help us add "punch" to this photo.

3.  The Tone Curve should be set between the Medium and Strong Contrast settings.  If you are comfortable with adjusting the tone curve yourself, a custom setting is the best here.
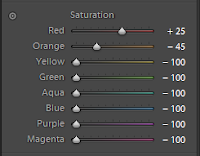
HSL Panel in The 300 Look: A Lightroom 4 Tutorial by Dakota Visions Photography LLC www.seeyoubehindthelens.com
4.  For the HSL (Hue, Saturation, Luminance) / Color / B&W Panel we will focus solely on the Saturation portion.  As noted in our settings for this photograph, the main goal here is to desaturate the photograph.  Note our settings to the right. 

5.  Continue on to the Detail Panel in the Development Module.  We are going to sharpen the photograph to the extreme - but the important parts are the radius, detail, and masking settings.  Note ours below:

Detail or Sharpening Settings in Lightroom for the 300 Look Tutorial by Dakota Visions Photography LLC www.seeyoubehindthelens.com

These should be the main settings to get you on your way to establishing a great '300' sytle photograph.  Note:  We post-processed in Adobe Photoshop using the magic wand to capture our model on and place on a black background layer.  Some darkening was done around the edges of the head plus placing a grunge texture in a light layer for additional effect.  No additional HSL or sharpening work was done in Photoshop.

We hope this gets you started on creating some of your own great looking 300-like portraits.  Presets can be your friend, but you really begin to learn how different development module panel features work within Lightroom to open the world of post-processing up.  Now..."Give thanks, men, to Leonidas and the brave 300! TO VICTORY!"

Don't forget to join us on Facebook, Pinterest, Google+ , Twitter, or sneak a peek at our photography on Dakota Visions Photography, LLC. Until next time, we'll see you behind the lens...

Subscribe to See You Behind the Lens...

Sunday, February 10, 2013

Photoshop Actions and My Fuzzy Memory

Sometimes it's worth just horseing around!  This is actually the 3rd shot to a series that I took to photostitch together, but decided to load a couple new Photoshop actions from a recent download session before getting to my 'real' work.  And lo and behold, it hit me - I hadn't really played with any of the default Photoshop actions!  So after a long stretch of perusing the vast world of Adobe Photoshop action settings, I came across what I felt was a nice rendition of my memory.  Often it's fuzzy - rarely crisp, colorful - but sometimes grey and hazy, but just clear enough to let me remember why I felt a certain way. 

So today...hop into my head and come back to Spearfish Canyon with me during the beautiful fall color run. 
Photoshop Actions Used on Fall Colors in Spearfish Canyon by Dakota Visions Photography, LLC www.seeyoubehindthelens.com

Don't forget to join us on Facebook, Pinterest, Google+ , Twitter, or sneak a peek at our photography on Dakota Visions Photography, LLC. Until next time, we'll see you behind the lens...

Subscribe to See You Behind the Lens...

Sunday, February 3, 2013

Photo of the Day: Black Lab in B&W Study

Sometimes, it is nice just to post a photograph because you want to.  Today's photograph is in honor of our sister-in-law's birthday.  (And not only that - but our 100th post at See You Behind the Lens...!)  We just love this B&W look, with the stunning details.  But then again, a beautiful black lab in the shining sun doesn't need a whole lot of touching-up!  We hope you enjoy gazing into her eyes like we do...

Black Lab in B&W by Dakota Visions Photography LLC www.dakotavisions.com
Roxie...

Don't forget to join us on Facebook, Pinterest, Google+ , Twitter, or sneak a peek at our photography on Dakota Visions Photography, LLC. Until next time, we'll see you behind the lens...

Subscribe to See You Behind the Lens...

Friday, February 1, 2013

Opportunity Knocks from onOne Software - Are You Listening?

From the makers of Perfect Photo Suite 7 , onOne Software, Inc, has released Standard Editions of Perfect B&W 1, Perfect Effects 4, Perfect Portrait 2, and Perfect Mask 5.2.  Designed for photographers of all skill levels to enhance, stylize, and improve images, these Standard Editions work as standalone applications and allow for direct photo editing without the need for additional software such as Adobe Photoshop, Adobe Photoshop Lightroom, or Apple Aperture.

Opportunity Knocks from onOne Software - Are You Listening?  Blog post by Dakota Visions Photography LLC www.dakotavisions.com
Created with onOne Software's Perfect Photo Suite

Photos open directly through the Standard Edition browser.  One-click effects, presets, or automated adjustments may be applied to create new looks, solve problems, or act as a starting point for creative inspiration.  Designed by professional photographers (like Brian Matiash, Curriculum & Education Manager), each product includes the best tools that address specific digital photography needs and assist with the creation of the most popular and sough-after looks seen today.  With these powerful tools, photographers of all skill levels can enhance and stylize all of their photos quickly, solve today's most common digital photography problems, and get professional level results easily.

Opportunity Knocks from onOne Software - Are You Listening?  Blog post by Dakota Visions Photography LLC www.dakotavisions.com
Created with onOne Software's Perfect Photo Suite

Perfect B&W 1

Perfect B&W 1 converts images to black and white and offers dozens of expertly crafted presets that replicate both traditional and contemporary processing techniques.  Additional tools are also available to adjust tone, contrast and more.

Perfect Effects 4 

Perfect Effects 4 includes instant-click and paint-in photographic effects that allow users to create unique looks - from subtle to dramatic - for their images.  The Standard Edition includes a library of more than 295 effects that can be browsed through and previewed on the image being worked on, offering inspiration on what stylistic path to take.

Perfect Mask 5.2

Perfect Mask 5.2 removes and replaces backgrounds.  Powerful tools make selecting subjects and isolating backgrounds for removal extraordinarily accurate - even around tough subjects like hair, tree branches and glass.

Perfect Portrait 2 

Perfect Portrait 2 makes portrait retouching fast and easy.  With Perfect Portrait 2, users can improve skin texture, remove blemishes, even out skin tones, and enhance eyes and teeth with natural and realistic results.

The Standard Editions of Perfect B&W, Perfect Effects 4, Perfect Mask 5.2, and Perfect Portrait 2, work as standalone applications on Macintosh and Windows computers.  Delivery method is via download only.

Availability

All Standard Editions are now available from onOne Software.  Each of these Standard Editions may be purchased for $29.95 and delivered via download.  Complimentary email and online technical support are available with purchase, along with 90 days of live phone technical support.  Free 30-day trials of each Standard Edition are currently available.

Opportunity knocks from onOne Software - are you listening?


Don't forget to join us on Facebook, Pinterest, Google+ , Twitter, or sneak a peek at our photography on Dakota Visions Photography, LLC. Until next time, we'll see you behind the lens...

Subscribe to See You Behind the Lens...